Showing posts with label house projects. Show all posts

Kitchen Remodel on a Budget

kitchen_remodel_pinterest_painted_cabinets

kitchen_DIY_best_makeover

It's been a while since this kitchen remodel actually happened but as you can tell recently I've been a little busy. Actually that's not true because "busy is another word for 'Arsehole', 'Arsehole' is another word for a guy you're dating. You deserve a fucking phone call." {He's Just Not That Into You reference anyone??} Anywho, the real reason I haven't been able to write this is because I needed decent lighting for photographs and a time to deep clean the kitchen. I mean no one wants to see a remodel with plastic Ikea cups all over the damn place do they or doooo they!

before_after_kitchen_cabinets

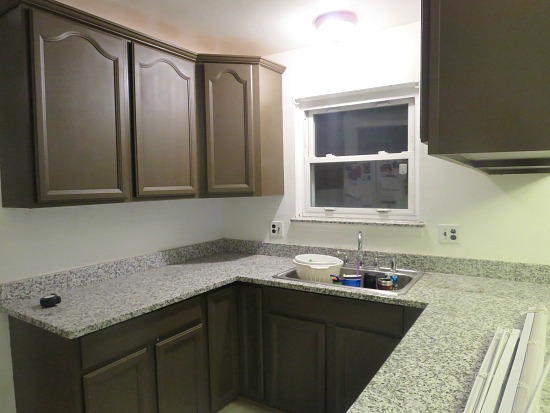
Let's start with the cabinets. I told Jerek when we moved in they would be stained, no questions. They were this ugly light oak and I hated everything about it. I had been pinning painted cabinet's for months so I figured I knew what to do. Like most things I pin I don't read 99% of them so you can bet when it came to staining the cabinets I didn't read any of this shit and told Jerek we were going to sand the cabinets and stain them a beautiful rich dark espresso. Easy right.

WRONG!!!

stain_kitchen_cabinets_DIY

Long story short, the base of the cabinets were real wood but the doors were this weird fake wood laminate type thing. So when Jerek, his dad and I all took off work thinking we would bang the cabinets out in an 8-hour period we were sadly mistaken. There were some words said, some 'I told you so's' mentioned and we nixed the stain and went to Sherwin Williams and bought paint.

Yep. I was wrong, Jerek was right.

DIY_kitchen_remodel

Once we painted the cabinets I turned back to Pinterest, smart right. What they don't tell you about not actually reading pins on Pinterest, is that once you paint the cabinets you need to cover them with a clear coat. Well, we never did, so if anything spilled on the cabinets and you tried wiping it off the paper towel particles would stick to the cabinet. They were looking super janky and Jerek kindly reminded me every time that it was my fault we ruined the perfectly good cabinets. Whatever dude.

Flash forward a few months and we were planning out what to do with our tax money refund. Jerek being the finance freak that he is priced things down to the penny and basically said we could 'refresh' the kitchen for about $450 and save everything else towards the wedding.

before_after_kitchen_DIY_remodel

cactus_kitchen_suculents


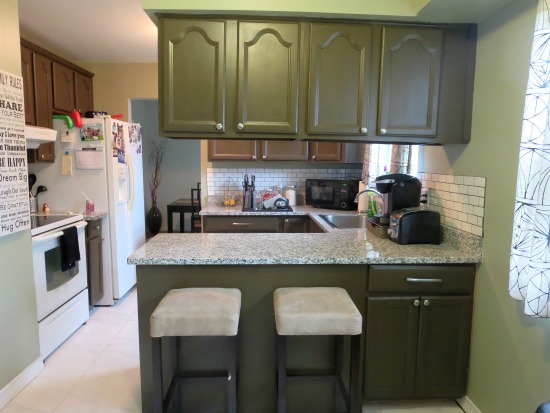
With that, we headed to the man store, {what Tracen refers to as Lowes} and we purchased tile, paint and hardware. Jer started demo-ing the horrible, tiled backsplash behind the oven which was plastered to the wall, seriously WHO does that? He ended up gutting and replacing the entire dry-wall because it was ruined from the old tile. Once that was finished we painted the walls, Svelte Sage by Sherwin Williams and I love it. It's this taupe green warm color and it makes the kitchen feel so much more inviting when you walk in.

Moving onto the cabinets, we finished what we started and put a clear gloss over them which made cleaning them 110% easier! Next time I will read the entire pin, I swear.

DIY_kitchen_remodel

subway_tile_DIY

subway_tile_DIY


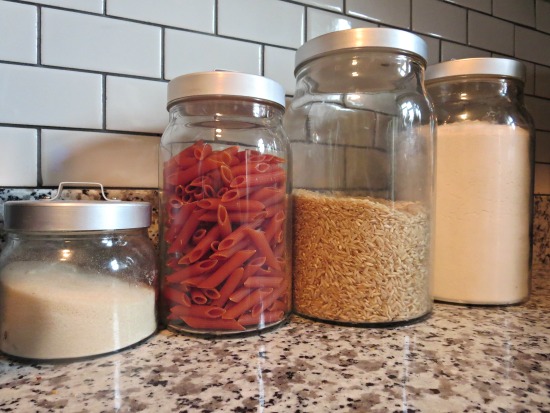
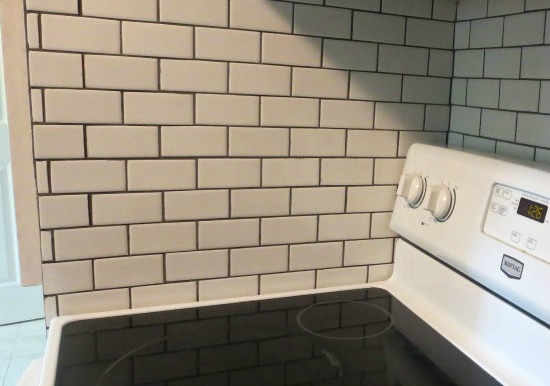
After the cabinets and walls were painted Jer got working on the tile. My heart beats for subway tile. Okay that sounds really lame but I love subway tile. All colors, all sizes, I want it everywhere. For the kitchen backsplash, we went with a smaller size since they came in 12x12 sheets and these were much easier to apply than the single large ones. I know this because I watched Jerek do it, not because I was the one that actually did anything in this kitchen. My duties were making sure no kids stuck their little grimy hands in paint, grout or tile adhesive. At first we bought white grout for the tiles but after talking to our brother in law and watching some Youtube videos, we decided that gray would be a much better option. I can't explain to you how happy I am with this choice too! It makes cleaning the tile easier and the over-all look is so much better!
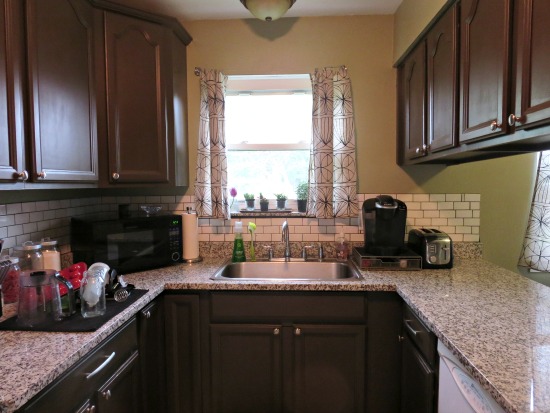
DIY_finished_kitchen
[No, I couldn't be bothered to put the dishes away before I took pictures}

After the tiling was done we fought about hardware on the cabinets for a long time and finally went with these ones. We did small knobs for all the doors and long handles for the few drawers that we had. I found curtains on sale at Ikea that were super, mega long so I cut, sewed and hemmed them to make curtains for both sets of windows, savvy right. 
DIY_finished_kitchen

I love how everything turned out! I still hate all the old white appliances, but beggars can't be choosers right now, we have a wedding to pay for. Jerek and I both agree and we will probably gut the entire kitchen within the next 5 years,  maybe sooner if I'm on my period one day and decide I hate the place, but for now I absolutely love it. The bar stools are from At Home, the lighting is from Lowes and the random dishes are from college, yea we really need to register for the wedding!

You're probably wondering if we really did this for $450 and I started to keep receipts to see what we actually spent but Jerek would always end up running to the store to grab things here and there and I lost track of it to be honest. If I had to guess I'm thinking it was under $600 and no more than that. We probably spent an extra $100-150 on extra supplies and random trips which isn't too bad!

When people think of kitchen remodels they think of mucho money but it doesn't have to be. You can redo or what we like to call a 'refresh' for a reasonable about of money. Remodels or refresh's can also we done WITH children in the house you just have to get creative. There's no way you'd catch me demoing the kitchen or re-drywalling something in the house, I'm much happier at the park playing with the boys while Jerek has some peace and quiet and can get some work done. Also, baby gates save lives people! We had two up at all times and basically told the kids they could have ice cream if they let daddy get work done, hey it works! Naptime and nighttime are two of the times where we got the most work done. Yes, we stayed up really late some nights working on the kitchen {or other projects} but that's because we choose to spend the daytime with the boys instead of stressed out trying to get work done. Maybe we're tired at work the next day but it's worth it when we wake up and walk into the kitchen in the morning for coffee, I promise.

Happy remodeling people! 


Bathroom Refresh on a Budget

We've been in our house for almost a year, March 28th is our homeowneriversary to be exact. When we first did our walk through I could see past the moth ball scent, I could get over the old people decor an even see past all of the chandeliers in every room, hallway or closet. Okay maybe not in the closets.

Every room in the entire house was painted in some ugly color with a glossy finish that we weren't sure what room we would repaint first but we knew every single room would need to be and need to be done fast! The first week we owned the house we painted for hours after work and like all projects here that really meant Jerek & his dad painted and I made sure the kids didn't get in his way. 

Slowly but surely we've repainted about 90% of the entire house. The upstairs main bathroom really needs to be gutted but we have a wedding to plan so that probably won't be happening anytime soon. This is unless Jer can hit one of these damn power balls, come on beach I believe in you! A few weeks ago we had Martin Luther King Jr. day off but the boys still had daycare so a free day for mom and dad it was!

We had talked about about giving the bathroom a facelift for a while now so with 8 hours of no children we got to work. We knew that we didn't want to spend a ton of money since this wasn't a remodel, it just needed a little pep in it's step.

The main thing that bathroom needed was paint. Every time we walked into the room it me to make eye contact with those walls! Whatever were these 70 year olds thinking with this bright blue paint?! Maybe they were already dreaming of the Flordia water even before they sold us this house or maybe the paint was 70% off at ACO like the rest of the house was {these people LOVED a good deal!}


The paint we used was left over from the living room of our old rental house and I think it took maybe a gallon to do two coats on the entire room. If you're wondering what those two pokey things are sticking out from the wall, they are hot and cold water pipes. These people had some ugly floor to ceiling cheap cabinets hiding them. So instead of putting in a double sink they put in cheap cabinets {which we chucked.} When we gut this bathroom we will be installing a big glorious double sink and I can't wait!


Since we were stuck with the tile in the shower we had to plan around it. The orange bath mat is from the Nate Berkus line and I'm pretty sure Jerek wasn't too found of it at first but I think it's growing on him. We already had the Threshold shower curtain from when we moved in so I bleached that baby and it was good to go.


I knew I wanted to keep the feel calming yet fun with the colors and textures so off to Target I went. I'd been eyeing these Threshhold vases since last spring but refused to pay $30 a piece. These bad boys were on mega sale and I scored them for a whole $5 a vase! I picked up the eucalyptus stems from Home Goods and have a ton left over for future projects. I also picked up a few new hand towels since the ones we had in there before were probably mine from college, ya, like 5+ years old!

The final touch was added with the relax letters in navy. If you remember my dressing room tour from about 6 months ago you will notice these use to be bright turquoise. I'm slowing changing up the decor in that room and thought that painting these a deep navy would be very fitting for the bathroom. "Come in, relax and take a poop!" ya know, the important things.

I'm obsessed with this little stool that I picked up at Home Goods! Jerek asked what the hell we needed a stool for in the bathroom but once he sat on that thing and enjoyed a cocktail while the kids took a bath he understood why! We use to sit on the floor or on top of the counter while they played and our ass would go numb in about 2 seconds flat! This stool reminds us of a sauna that we so desperately want one day!

I'm sure you're wondering one big question, HOW MUCH DID IT COST THOUGH!?!?! I mean, that's really what things come down to so here are the numbers:

Paint: FREE! {left over from old house}
Rug: $12.99 {on sale + Target cartwheel app}
Vases: $5 each, $10 total
Eucalyptus Stems: $7.99 
Hand Towels: $5 {for 2, on sale}
Shower Curtain: FREE: {old-bleached to make it nice & new}
RELAX letters: FREE
Navy Paint: $1.50
Stool: $20

TOTAL COST: $57.48

Yes, you're reading that correctly, less than $60 for this whole room! Now I'm going to admit, this room is no where NEAR what we really want it to be! We want to gut the entire thing but for now it's SO enjoyable! The whole point when refreshing rooms or spaces is to make them more functional, more enjoyable and to accomplish it on a budget! We jumped into this project KNOWING it wouldn't be a bathroom remodel so our expectations were very realistic when the room was finished. We still need to find a curtain for the window but for now the 1970's plastic shade will have to do.

Hopefully next we can get working on the kitchen since I hinted about painting the cabinets about 6 months ago and then never showed you any updates! Such is life ya know! 

Until then!

Dining Room Remodel

When we first walked through our house all my eyes saw was DIY and remodel projects. As I've stated before in my half bath remodel, it was an older couple moving to Florida to retire and live life on the beach. The house was covered head to toe, wall to wall and ceiling to ceiling in semi-gloss paint. The colors were not anything we wanted to keep and there were chandlers everywhere you looked.


Before I start listing off everything we used, paint colors and where we bought things I think you should know that having a dining room was #1 on our must haves, besides 3 beds and a place to poo. The reason being, we ate every meal on our coffee table in our rental house for almost 4 years. When we originally signed our 2 year lease we figured Trace would be in a highchair till then and it would be NBD for us to eat there. Well fast forward 3.5 years and we still hadn't moved, we couldn't have people over for dinner and the table was getting small for two adults and a busy toddler. Not only did we have three people eating around it but we had a newborn and we were out growing the house and fast!

Back to the time when we were walking through the house. When I saw the dining room I was elated! Then we walked into the kitchen and I also saw a spot for an eat in kitchen table! I had dreams of booth seating like this and this. After a few months we realized that it was going to take some time to find or make the perfect booth with table and chairs and that it was more realistic to get the dining room set up instead. Most people would call this a 'formal' dining room but there is nothing formal about me so there sure as hell will not be a room in our house that we are only in for holidays and special occasions.


First things first, that baskin robins mint ice cream wall color has gots to go! We knew that we wanted to do an accent wall {I'm secretly or not so secretly obsessed with them} So I had Jerek run to Sherwin Williams to get the white that we needed so we could start on the walls and ceilings and figured we'd talk colors over dinner. Well Jer called me while at the store and said "What do you think about purple? Well actually it's called Exclusive Plum and it's the color of the year." I have to admit, my jaw dropped. Did he just say he wanted to paint the dining room wall purple?? I googled the color on my phone while he was talking and fell in love just like that! It was rich and bold but not too bold and not a color that I felt would go out of style next year. I told him yes and he arrived home soon after. I also told him that I would give him a major shot out in here and let you all know that HE was the one behind the color picking and I actually had nothing to do with it! So here you go Jer, props to you my love!

{still looking for a large art pierce for this wall}
{sneak peak of the kitchen cabinets to your right, post to come} 


WHATS IN THE ROOM:
- Table- {BJURSTA}-IKEA (has a large leaf that comes with, when in, seats 10 people comfortably)
- Chairs- {BÖRJE}-IKEA
- Seat covers {chairs some with white but we bought Skiftebo beige- east to remove and wash as well!}-IKEA
- Light- {NYMÖ}-IKEA
- Table runner- {burlap}-Target
- Center piece-Garden Ridge
- Curtains- {chain link print- 84 inches}Home Goods
-Curtain rod- Home Goods
- Paint- Exclusive Plum {SW 6263} Sherwin Williams


We hung the curtains all the way to the ceiling to give the illusion that we have some huge mamajama window in there, when really it's some odd shape that I can't find anything that fits and don't have time to sew any either. So I did a good old Pinterest search and found tons of these small windows with 84-96" curtains hung. I saddled up and went to Home Goods looking for this link print {in a cream color} but fell in love with the carmel color you see here.
Remember when you would lean back in your chair at dinner and your mom would tell you to stop because you were either going to break the chair or fall on your ass? Well Jerek still doesn't listen and did just that, minus the falling {dammit!} We are still using the chair, he's being more careful and when we can we will venture to Ikea for a new one as well as two more to keep in storage for when we host {Ek, I can't wait!}

THINGS STILL TO DO:
-crown molding
-rip carpet out
-install new floor/refinish hardwood under carpet
-new molding
-artwork on wall

Everything seems to have come together nicely and we spend a lot of time around this table talking and laughing, something that was SUPER important to me. Growing up my family ALWAYS ate diner around the dining room table together and it's something I'm forcing upon my kids. Time spent talking with kids about their days, their problems or their funny stories are times when kids can hopefully open up to their parents and this is something I can not stress enough is very important to Jerek and I. We usually go around and say what our highs and lows are for the day, Tracen asks if he's eaten enough and can have nilla {vanilla} ice cream yet and Ducati eats Skylor's scraps that he drops purposely throws down under his seat. I never take this table/room for granted and you can find me on my computer editing pictures or writing posts here as well. I just love how it looks into the front living room as well as into the kitchen and back family room. It is truly one of my favorite rooms in the house.


 photo sigblack_zps3e34ee48.png

Half Bath Makeover

Before we bought this house Jerek would tell me he's bored every weekend. He wanted projects to do, things to paint and wood to cut. So when we bought this house all I could see was "projects!" The reason we loved this house so much was because the bones were so solid we knew that it would be 90% designing and home improvement projects that we would enjoy doing. Our roof is a few years old (a complete tear down). The furnace, air conditioning unit and water heater are all under 5 years as well. The windows  and appliances are not the originals but they aren't brand new. In other words, they're fine!

Before we moved in we spent a week coming here with both kids and we sanded, painted, and redid the entire upstairs bedrooms, hallway and staircase. I'm not done decorating those rooms yet so you will have to wait for those pictures & posts to come! Just picture this though, heavy semi-gloss paint on every single room of the house, all light switch covers, door knobs and vents were a different color/design. Ugly chandeliers hung in almost every room and hallway and there were blinds, shades and curtains on every window, it was...interesting!

The half bath was something that was not necessarily on our NEED list. We were use to sharing and getting ready in one bathroom so having two would be something new for us. The half bath is off of our back family room and right next to the garage and measures about 3ft by 6ft. As soon as we found out we got the house I knew what I wanted to do with most of the rooms but the half bath was something I already had planned out. The sink that was in there was so big that even I had to walk in side ways just to get in and pee.


Call me crazy but I already had a sink picked out. It was the smallest sink I'd ever seen and I always wondered what people used it for. I had seen it at Ikea a hand full of times but never in a room setting. Let me introduce to you the LILLÃ…NGEN. It is the smallest sink I've ever seen and the highlight of our bathroom!

Things we changed:
-Removed medicine cabinet & patched up
-Removed old sink
-Installed new floor
-Installed new sink
-Installed new shelves
-Painted mirror in Radiant Red
-Painted walls in Essential Gray


When you have two full-time working parents and two small kids it's really freaking hard to find time to do remodels! While this may take the normal person a day, maybe a weekend this took us a good solid week! Tracen wanted to help with EVERYTHING and when we told him 'sorry dude, it's just for daddies' he threw a big fit! {OH HOW I LOVE TODDLER MELTDOWNS!} While some people would wait until their kids are down to bed we didn't want to wait because that's when we get to spend one on one time together. So to get this done we would come home from work and I would get dinner ready and keep the kids out of Jer's hair while he worked on the bathroom. We had a baby gate up so Tracen could watch from a far but not stick his hands in the paint {he still was pissed about that.} Each day it was a different thing, painting, flooring, installing, etc. When it was all finished it was amazing! I still get nervous when I walk in that I'm going to check my hip bones on the sink but magically I don't!


SINK DETAILS:
Jerek doesn't like the idea or look of seeing the plumping so when we were at Ikea, we bought the following to cover it up:
-Lillangen sink base
-Lillangen Frame
-Lillangen cabinet {black-brown}
-Ensen faucet
FLOOR DETAILS:
When we gut the back family room we will be ripping out the carpet and installing hard wood floors but we aren't set on a color yet. So when we decided to do the bathroom and hallway flooring we went with something that will match a dark or light hard wood in the future. The color isn't showing of that great as there is no natural lighting but it has gray tones in it. It is a laminate floor but looks like hard wood unless you touch and feel it. We got two boxes and it covered the whole bathroom and small hallway outside by the garage!
We both knew that we wanted to keep the mirror and just paint it because it was in good shape. I wanted a pop of color somewhere and I knew this would be great. I've been seeing a lot of reds and yellows as pops of colors so I went with the red route. It turned out great and I'm not sure what I love more, the sink or the mirror! The only thing I have left to do is to find a few pictures and to put a candle on the shelves and were done!

BUDGET:
We didn't want to spend a ton of money on this room because after all it's just a half bath. And I wanted it to be neutral as we probably won't redo it for many years to come. We used this gray in two other rooms of the house and had a can left over so it all started there. Jerek had the idea of using the chandelier that I've had since college {I'm wondering he was sick of having it in our bedroom!} We knew we wanted and needed this sink so that was where 90% of the money went. My girlfriend had given us a Target gift card as a house warming gift so I used that for the two shelves. The trash can and tin on the back of the porcelain thrown we already had from the last house. We had the idea that we wanted to do this under $400.

COST:
SINK-$20+$60+$80+$50=$210
PAINT (walls)-$0
PAINT (mirror)- $4.99
FLOORING- $27.66 (2)=$55.32
HAND TOWELS-2/$6
SHELVES-$0 
MISC. SUPPLIES-$25

TOTAL: $301.31

We did this under our budget and it feels great! The left over paint and gift card for the shelves were big money savers but our decision on not do real hard wood floors was a huge cost savings as well. Something I've learned in the past few months is it reuse and repurpose! I have always been big on reusing but I've never realized how amazing things can be with a little spray paint!


If you have any questions on where we got something or how we did it please feel free to ask. I can't wait to show you the rest of the house as we go. We just finished the dining room in a few days {thanks to Jerek's dad!} and are now working on the kitchen cabinets which is a big sandy hot mess! Is it weird I want to send the old owners in Florida a card at Christmas with pictures of how much better our house looks now? Cause I do...

 photo sigblack_zps3e34ee48.png